Canva’s ‘Bulk create’ feature gives you the ability to rapidly create personalized documents by combining a template file and some well-structured data. In this guide I’ll show you how it works by creating some weekly report cards for students from a fictional school and you can follow along!
💵 This feature is only available with a Canva Pro or Teams account. If you don’t have one of those you may still be able to do something similar with other popular software packages. Microsoft Word calls it ‘mail merge’. Adobe InDesign and Affinity Publisher both call it ‘data merge’.
📵 Currently the bulk create feature is only available for web browsers on macOS, Windows, or Linux, or with the Canva app on Android or iOS tablets. It’s not officially supported on smart phones. I really recommend doing this on a regular computer, since the touch interface on the tablet app is a lot more finicky than using a mouse.
Gather your data
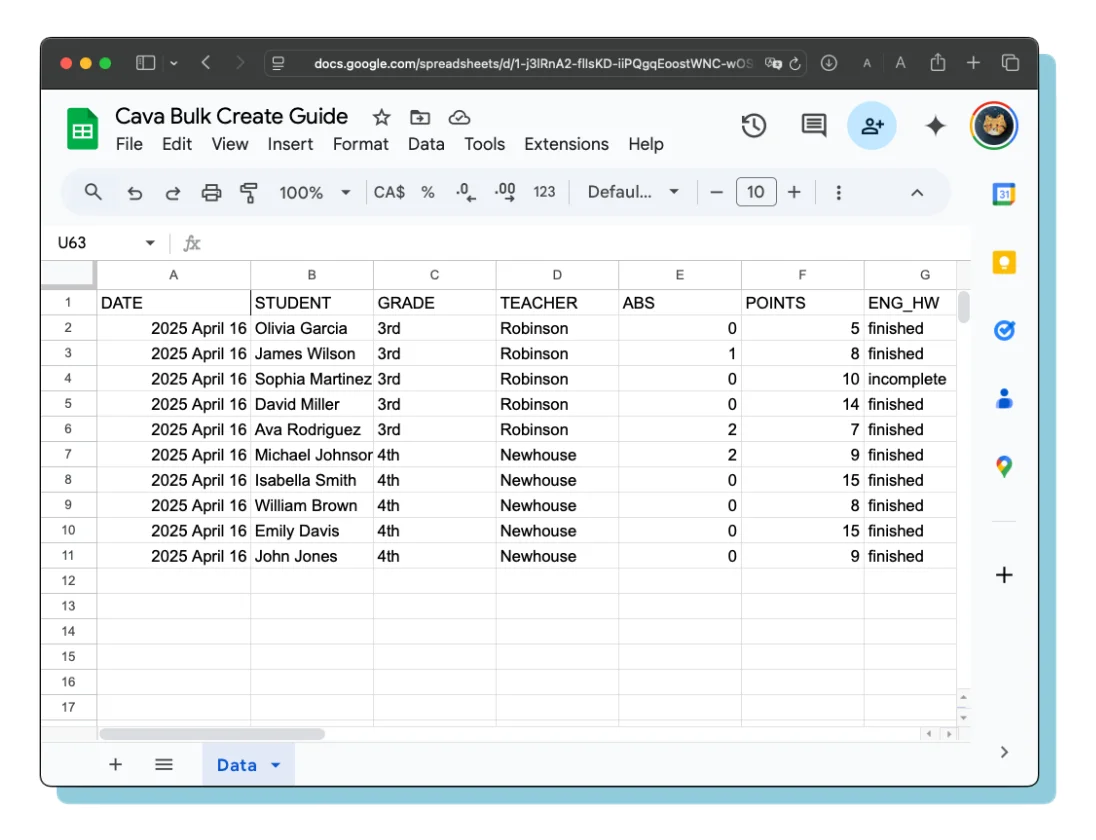
The first thing you need is well-structured data. I suppose for most teachers that’s going to come in the form of a spreadsheet, which will work perfectly. For this guide I’ve already prepared a spreadsheet with some made-up data. Open this link in a new tab and then come back here:
https://docs.google.com/spreadsheets/d/1-j3lRnA2-flIsKD-iiPQgqEoostWNC-wOSL_ktejBVI/edit?usp=sharing
The data for this imaginary class is a weekly summary of each student’s days absent, token economy1 points obtained, a basic assessment of their homework, and quiz scores.
The way the data is formatted is very important. Every row of data corresponds to what will be one unique document. This spreadsheet has 10 rows of data, so that means it can be used to make ten documents. You must also have a header row that contains a name for each column and those names must all be unique. I wrote the names in ALL_CAPS, but that was only to make them visually distinct. It isn’t required.
🎨 Canva prefers the term ‘design’ instead of ‘document’. I think the former is a little confusing, especially if you’re new to Canva, so I’m going to keep using ‘document’ throughout this guide.
Make a template
You have to create a document that serves as the template on which your customized documents will be based.
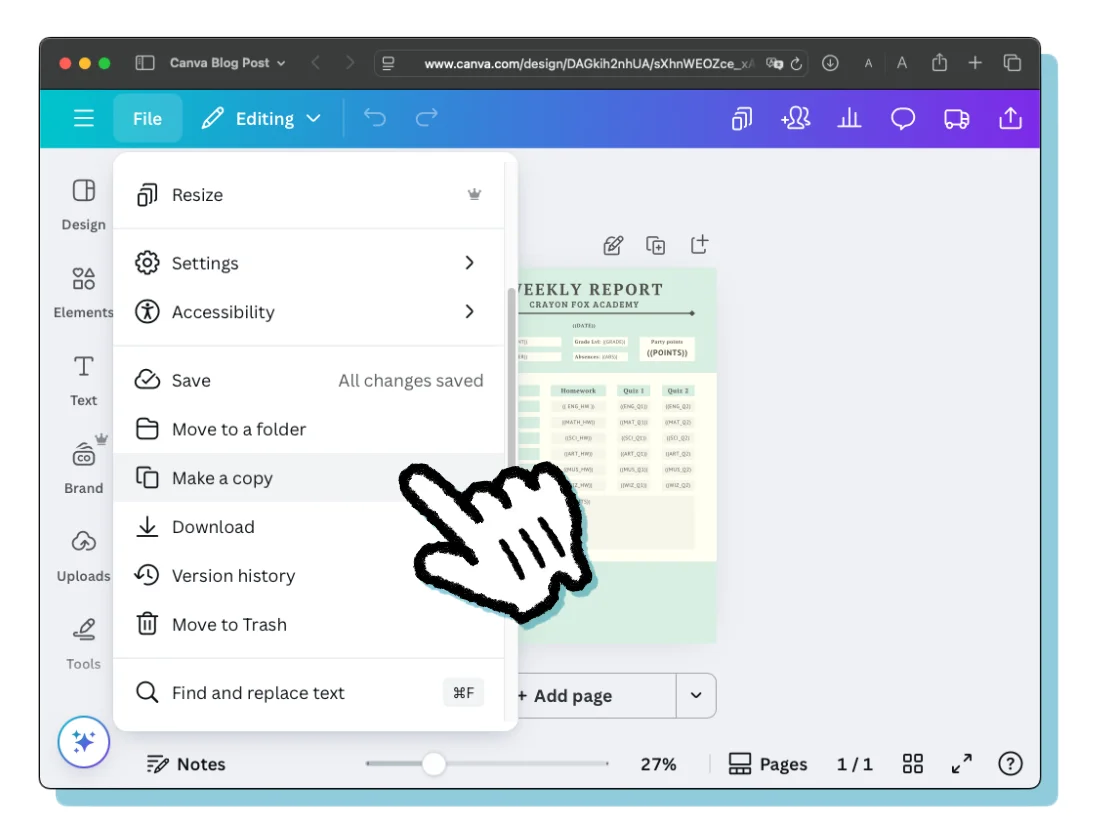
I’ve already made a template for you to follow along with in this guide. Open this link in a new tab, select ‘Edit template’ and come back here:
Tips for making a good template
I want to take a little detour in this guide and offer some advice for making a really good template. A well-made template will adhere to these three principles:
- Placeholders are easily distinguished from other text.
- Text boxes for placeholders are large enough to fit any data that is likely to be inserted.
- Textboxes are left- middle- or right-aligned according the needs of the final output document.
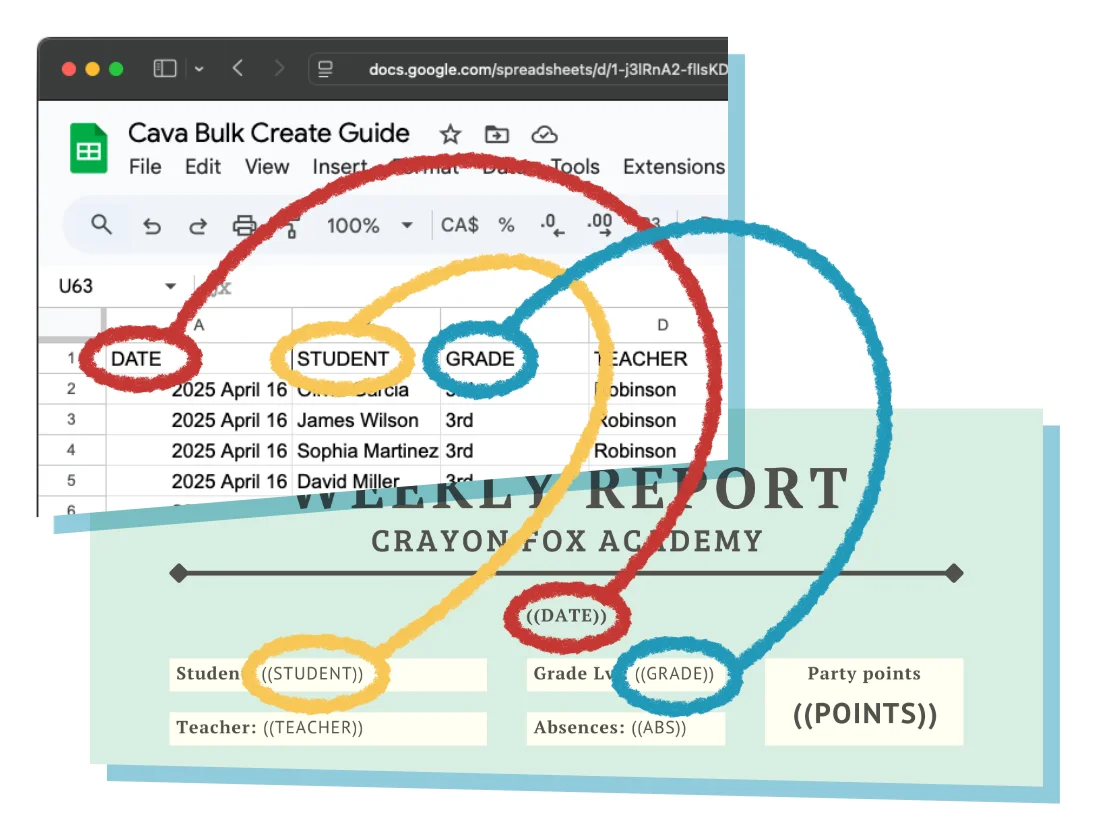
In the template for this guide you’ll see some odd-looking text like ((STUDENT)) and ((DATE)). These are placeholders that will be replaced with data from the spreadsheet. The capital letters and parentheses are not required, but I prefer this format so that they stick out amongst other bits of text that won’t change. Notice also that every placeholder in the template corresponds to a column in the spreadsheet. For example there’s a ENG_HW column in the spreadsheet and a ((ENG_HW)) placeholder in the template. It’s not strictly required that these names match each other, but I choose to do it this way so that it’s clear what data is going to replace a placeholder.
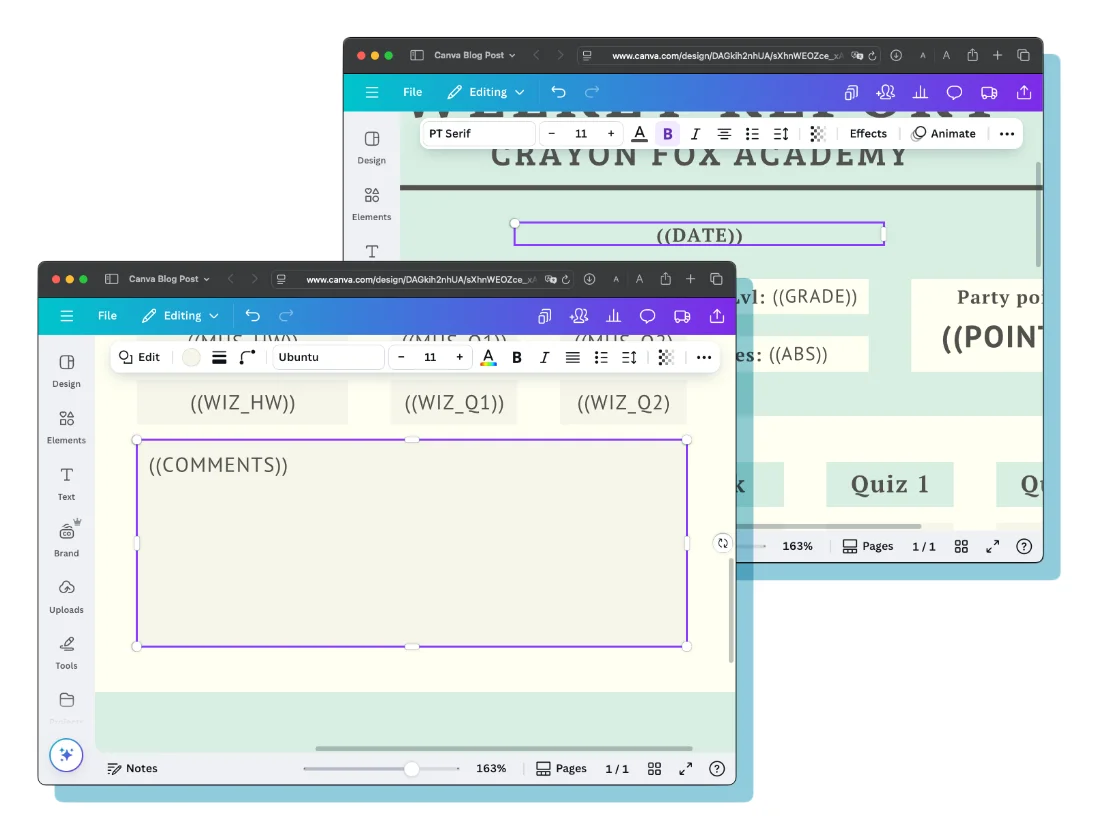
You need to be mindful of the boxes that contain your placeholders, making sure that they can accommodate any kind of text that might be inserted. That means you need to carefully set the alignment and width of the text boxes. In the template I made for this guide, select the ((DATE)) placeholder near the top. Notice that it is center-aligned and the box is wide enough to fit any date. In contrast, the ((COMMENTS)) placeholder near the bottom is left-aligned and the box extends to the edge of the area reserved for comments. If the comment data for a student is longer that one line, then it will go no further towards the right than that limit; instead it will flow downwards.
Add the ‘Bulk create’ app
Bulk creating documents is not a feature native to the basic Canva experience. Rather, it’s provided by an app (made by the Canva team) that is available through Canva’s own adorably miniature app store.
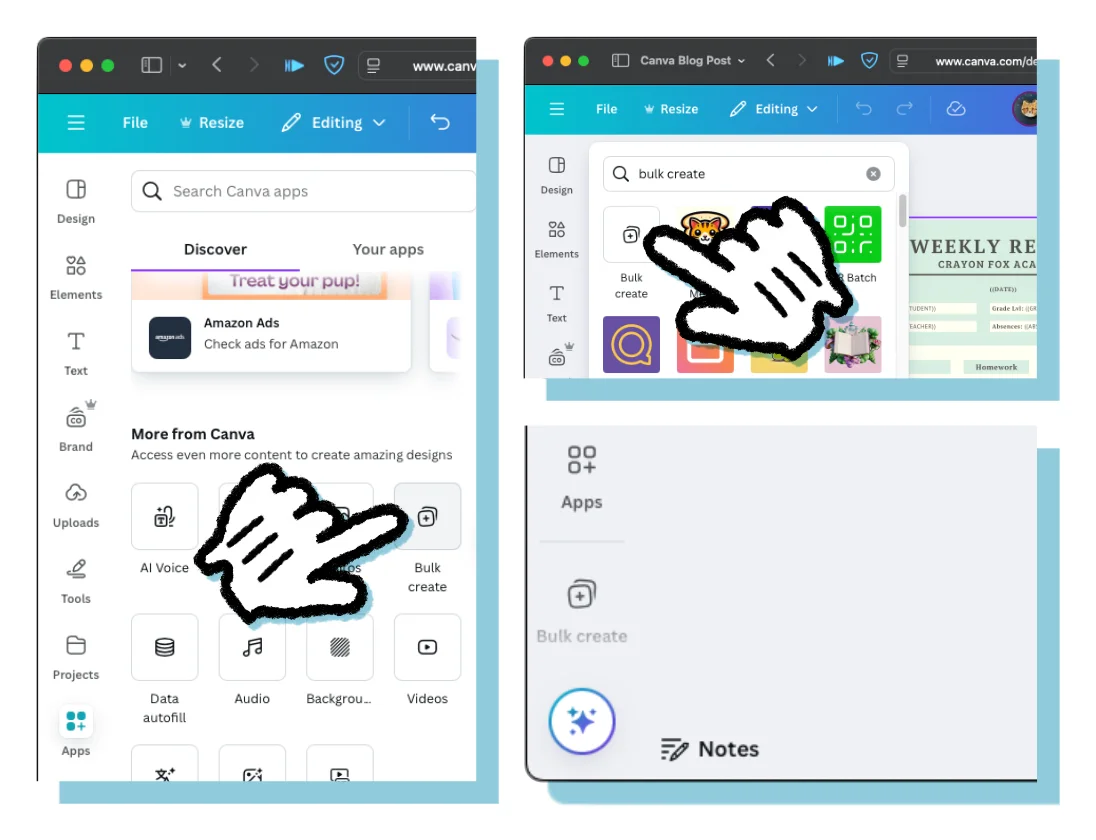
At the bottom of the left sidebar in Canva there’s a button labeled ‘Apps’. You might need to scroll down on a device with a small screen. That button opens a window where you can access apps that expand Canva’s abilities. A button for the ‘Bulk create’ app should be one of the recommended apps, but you can search for it if you don’t see it.
After using the app for the first time it will remain in the sidebar until you choose to delete it, so you won’t have to search for it every time you need it.
Import data
Now it’s time for you to move the data from the spreadsheet and into Canva.
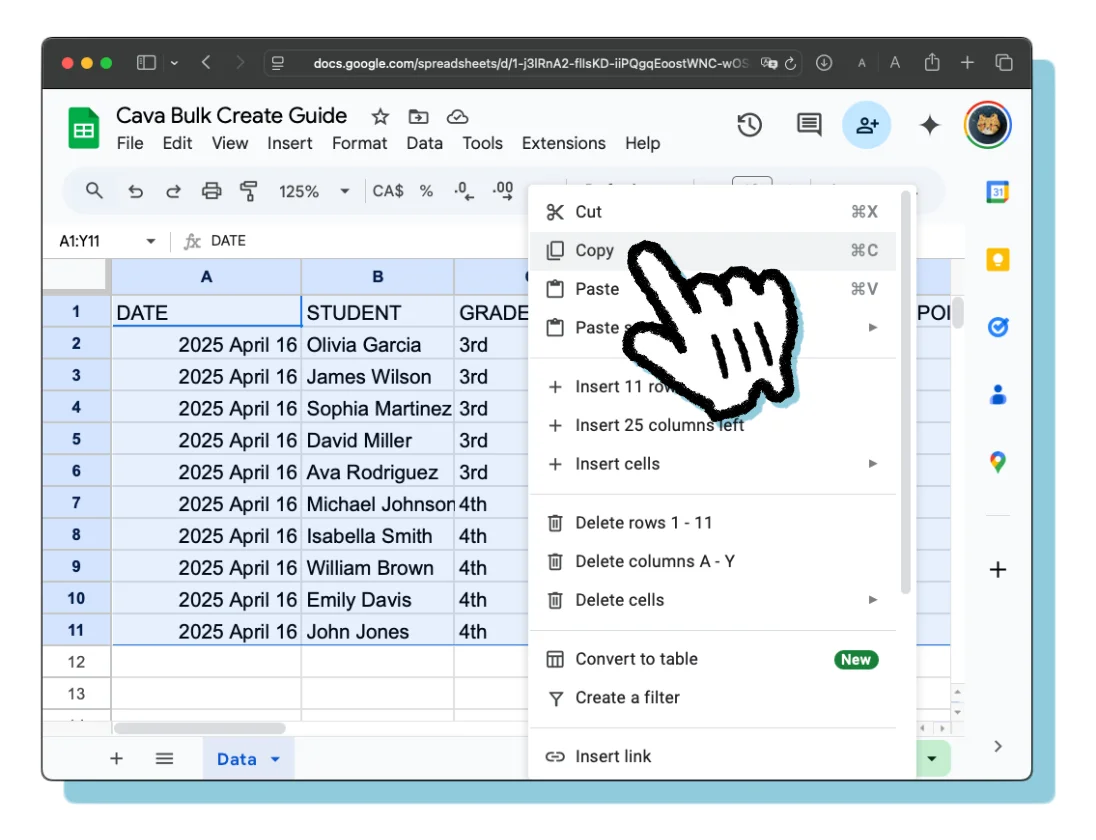
Select all of the data in the spreadsheet and copy it by using ⌘-c on macOS, CTRL-c on Windows, the right-click menu with a mouse, or the long-press menu on a tablet.
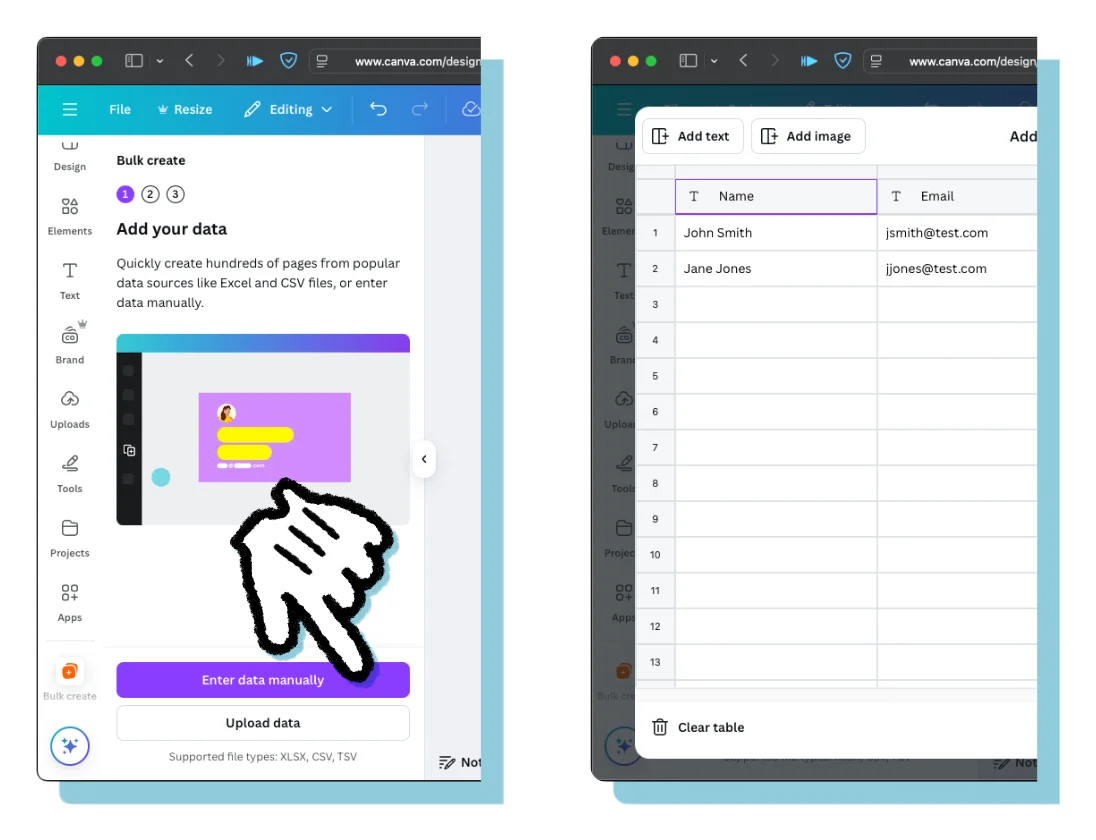
Go back to Canva and open the ‘Bulk create’ app using the icon on the left sidebar. Select the big purple ‘Enter data manually’ button. This will open a window that looks like a spreadsheet. It may have some simple placeholder data already there. If so, you can delete it by pushing the the “Clear table” button on the bottom left.
📥 There are a few other ways to import data that you can explore after you finish this guide. Just recently Canva started offering its own spreadsheet feature that makes connecting to templates very easy. If you have a Microsoft Excel file or a CSV file, you can instead use the ‘Upload data’ button and upload your file.
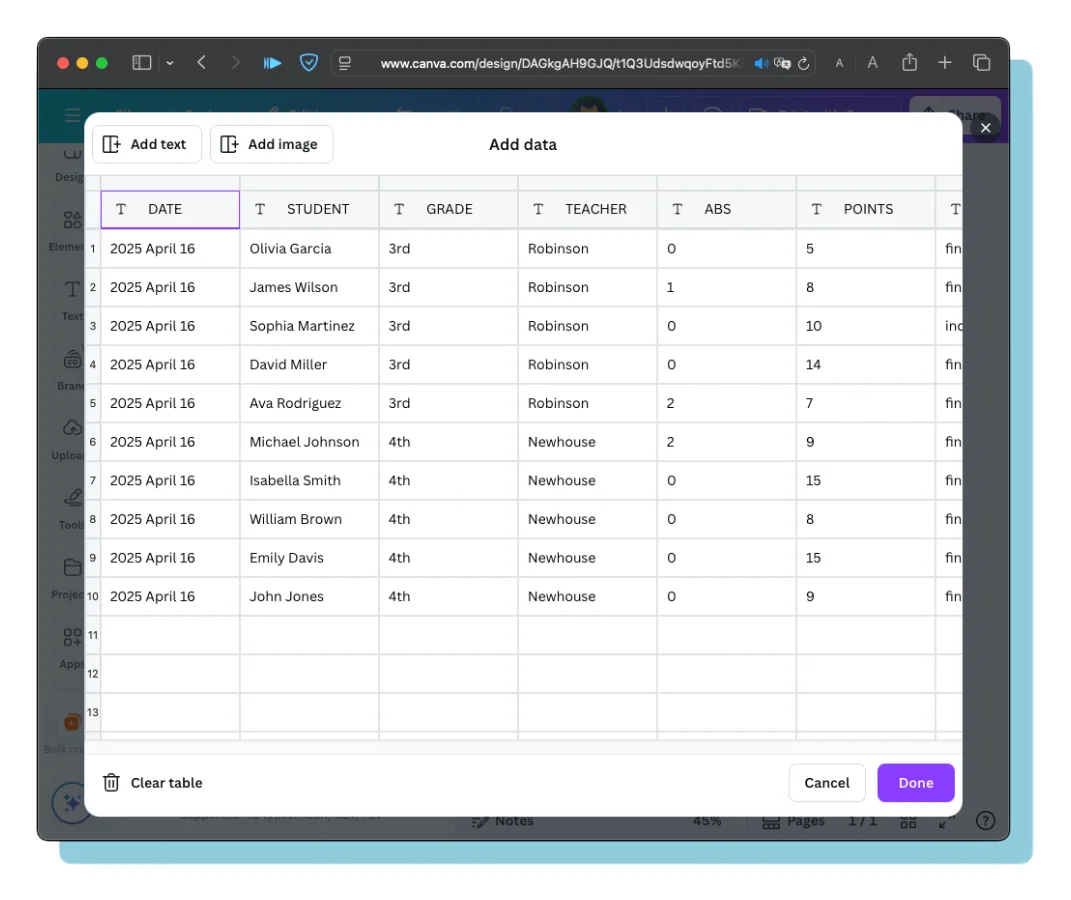
When the table is clear select the top left cell and paste your data using ⌘-v on macOS, CTRL-v on Windows, the right-click menu with a mouse, or the long-press menu on a tablet. Then press the ‘Done’ button on the bottom right.
🐛 BUG ALERT: I’ve encountered a bug on the Android app. Data copied from a Google Sheet can’t be pasted into Canva and instead you’ll get an error saying the data is not compatible. Until Canva or Google—I don’t know whose fault it is—fixes this issue you might run into trouble using an Android device.
🐛 BUG ALERT: I’ve encountered a bug on the iPad app. A few times I’ve noticed that the columns in the data entry window are not in the order that they are supposed to be and when I create the documents some data is in the wrong location. The simple fix for this is to clear the table and paste in your data again, including the column headers. Hopefully Canva fixes this soon.
Connect placeholders
Now you need to make connections between the data and the placeholders in the template. This is slightly tedious process, but you shouldn’t have to do it often.
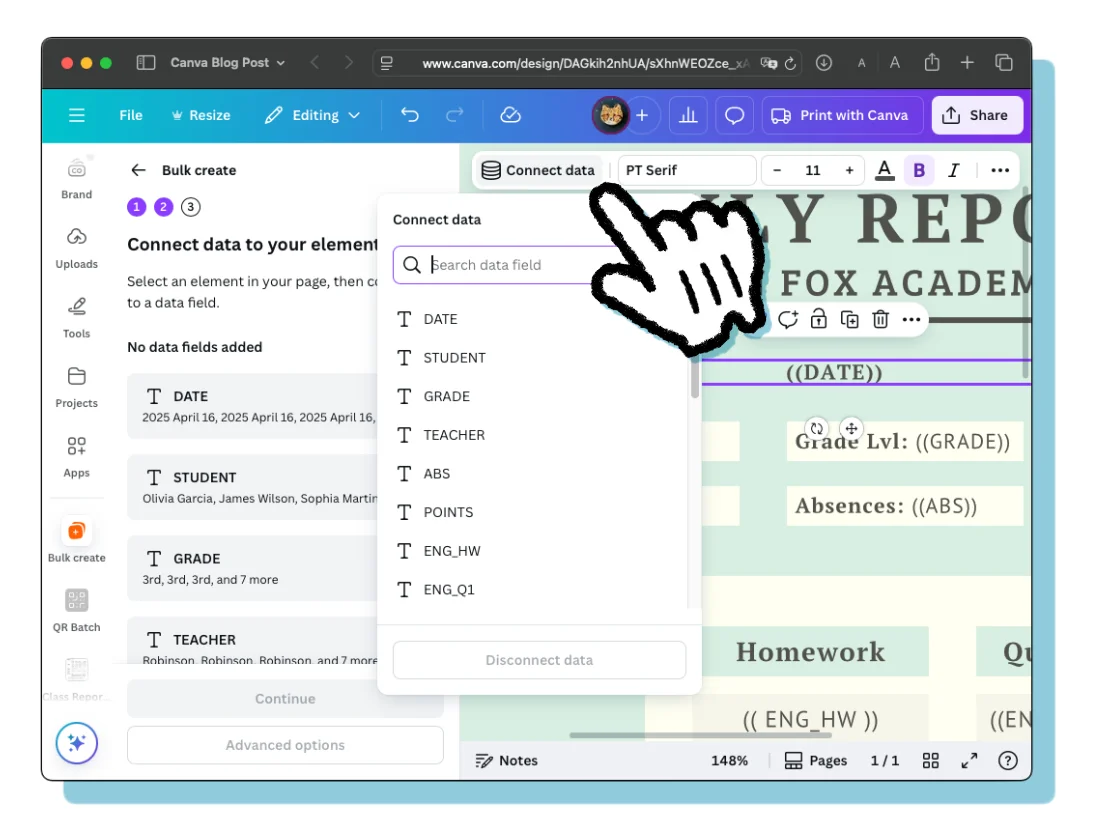
Start with the ((DATE)) placeholder. Click or tap it to select it. Near the top of the screen a little menu will appear with ‘Connect data’ on it. The same button appears if you right-click with a mouse or select the three-dots ( … ) menu on a tablet. That button, in turn, opens another menu where you can select which column of data you want to connect to the placeholder. Continue this for all of the placeholders.
📌 The bulk create sidebar must be open, otherwise the ‘Connect data’ button will not appear!
Start the presses!
After you’ve finished connecting all of the placeholders with the data, you can press the big purple ‘Continue’ button on the lower left. Beneath that there is another button for advanced options. With that you can choose to change the output folder and choose between outputting one document with one page per line of data (the default setting) or one document per line of data. I always choose the former to make printing easier.
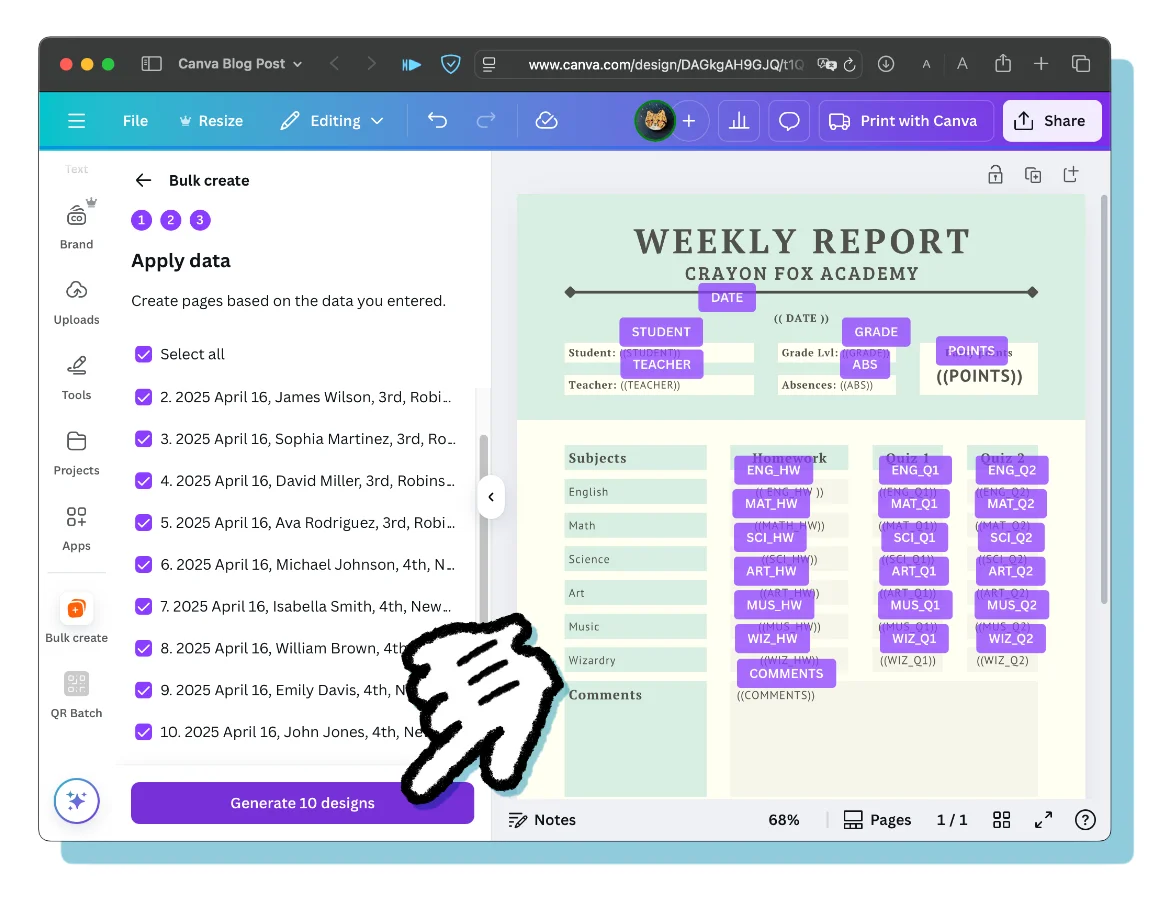
Next you will see a list of all of the documents that Canva is ready to create for you. If there are any you’d like to exclude, simply uncheck them. There’s another big purple button on the lower left labeled ‘Generate (number) designs’. After pressing this button a popup message will appear that will lead you to the new document if you’d like to view it immediately.
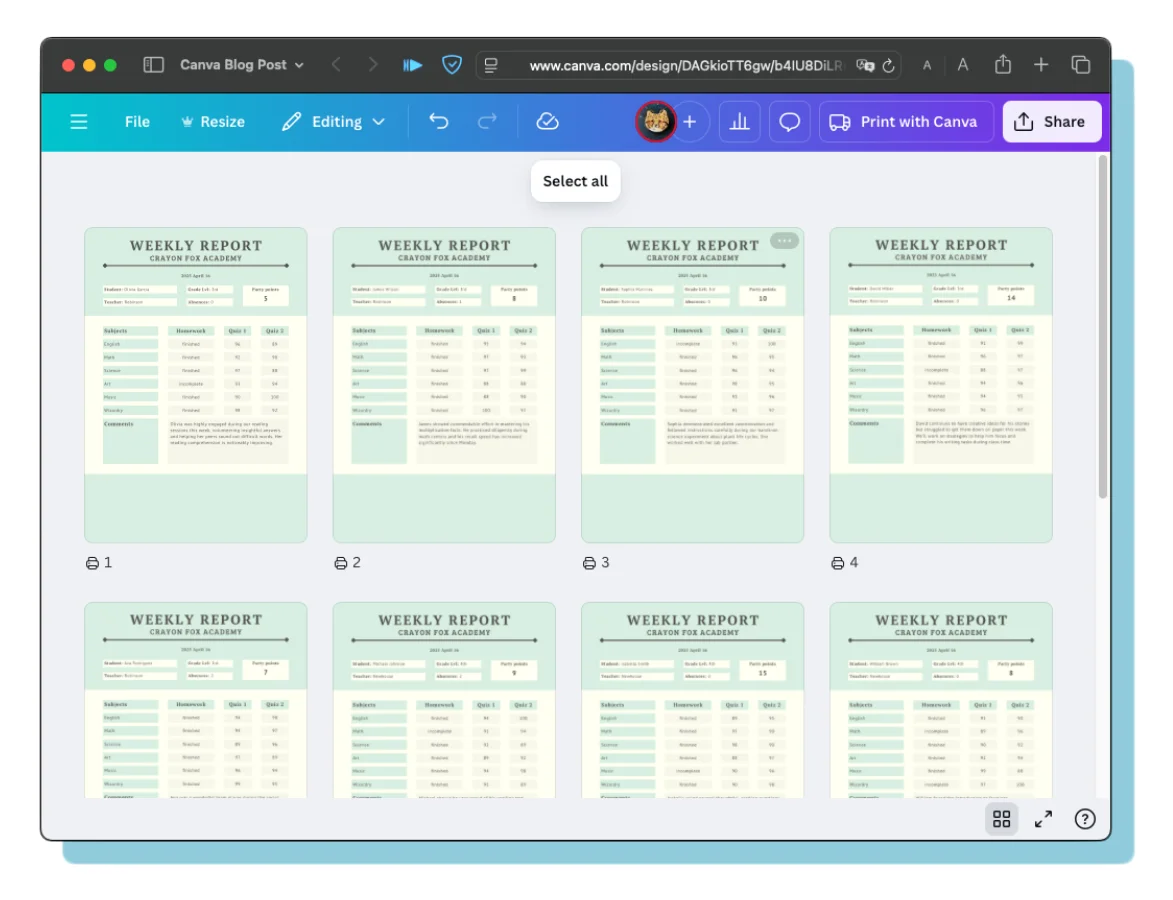
If you’re following along with this guide, then you will have just created one document with ten pages, one for each row of the spreadsheet and therefore one for each student. Canva supports creating documents with up to 200 pages!
Adding a little sparkle
I’m sure you agree that this is all really amazing and helpful, but maybe you’re also just a bit disappointed with how same-y these report cards look. Luckily you still have a chance to let your creativity shine.
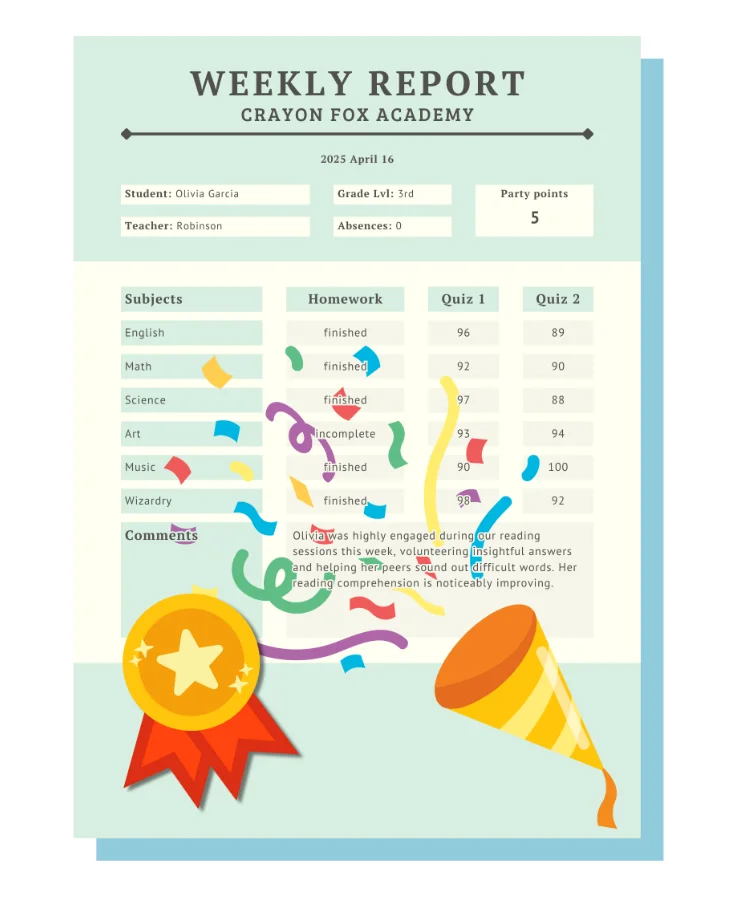
The document that you now have is a regular Canva document (or ‘design’ as they like to call them) and all of the editing features you are familiar with are available to you. You can adjust data that didn’t fit quite right, or make changes to the designs that are customized for each student.
Exporting for print
Creating a printable PDF is a pretty straightforward process compared to everything you’ve done up to this point.
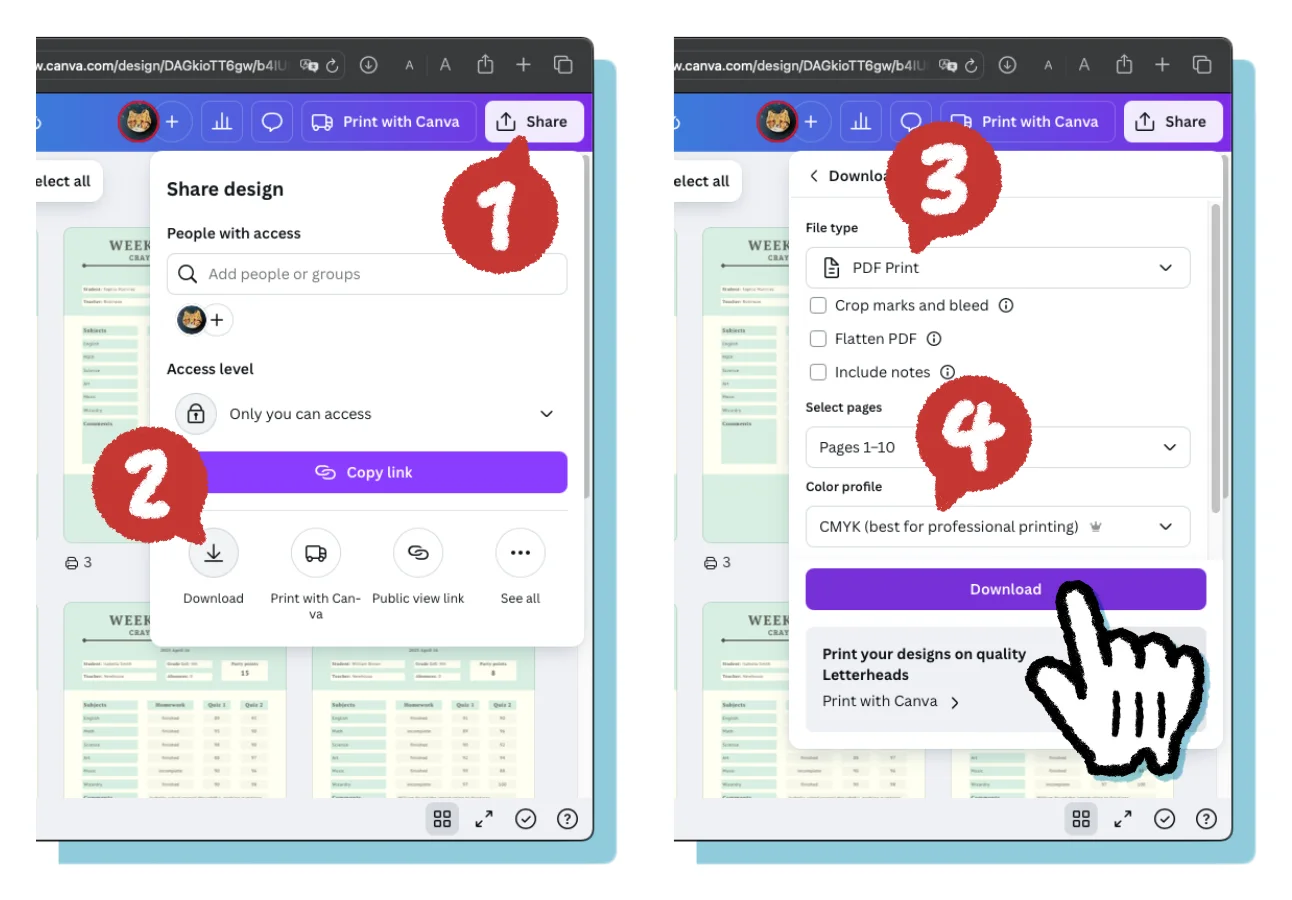
If you want to print your documents, start by selecting the ‘Share’ button on the top right. (Not the ‘Print with Canva’ button!) That will open up a menu with a button labeled ‘Download’ that you should select. In the drop down menu titled ‘File type’, select ‘PDF Print’. In the drop down menu titled ‘Color profile’, select ‘CMYK’. That last part isn’t strictly necessary, but it will help keep colors more consistent between what’s on your screen and what will be on the paper. Finally, select the big purple ‘Download’ button. After processing for a few moments, your PDF file should begin to download automatically.
What you do with your file is up to you. Email it, display it, print it! I hope you found this guide helpful. If you have any comments, I’ll be happy to read them -> chris@crayonfox.com
Footnotes
-
A token economy is a system for rewarding desired behaviors and discouraging undesired behaviors by means of awarding or taking away tokens. Acquired tokens can traded in for rewards. https://www.pacificautism.org/what-is-a-token-economy-system/ ↩
